


Over the last 25 years of my career, I have seen many changes occur in the tattoo community. One of those major changes is the ease and abundance of choices now available to the average tattoo artist when it comes to supplies. Tattoo needles of course being one of the most transformed areas of ease and selection.
Earlier Days of Tattoo Needles
When I first began, you would purchase a package of 1000 individual needles folded into a lined paper package about the size of a matchbook and a pack of pre-looped bars. Then I would sit in front of my designated area for making needle laying down a clean sheet of glass where I would place my various jigs, solder iron, flux and solder needle bars and needles that I had counted out into smaller groups for the specific use. Then using small jigs crafted for specific needle groupings I would take 3, 5 or 7 needles and make a liner or carefully align the front of a stack of needles making sure it was perfect before tacking with solder and then using a razor blade to weave mags.
This process could last hours and even with a small fan in use, I am certain I was inhaling the toxic fumes of flux and solder while occasionally burning my fingers on the soldering iron. Then I would clean them, package them, and sterilize them only to have to do it again for future appointments. Also due to how time consuming this process was as well as trying to save a few dollars, it was still in practice by some folks to reuse needles by cleaning and sterilizing them. Fortunately, this practice fell out of favor over time.
Unlike painters that just buy premade paintbrushes, for the tattoo artists, needle making was a cumbersome additional chore that was necessary to do the part we all really loved, the tattoo application.
Over the last 25 years, industrious individuals offered pre-made needles on bars, followed by mass manufacturing of Needles on bars. Then roughly 15 years ago, an innovation to the needle game showed up from the cosmetic tattoo world. The introduction of the cartridge systems which was a huge game changer because now one machine could run a myriad of needle configurations with just a twist of a cartridge.
Not only did pre-made/pre-sterilized needles offer a major time saving aspect to the tattoo artists, the abundance of needle size and configurations allowed artists access to more and better tools with which to practice their craft.
How to Choose the Right Tattoo Needles
If we think about the tattoo process, there are four main components outside of the artist required to make a tattoo. The machine, the needle, the pigment, and the skin (surface). This means that it is an area we should take time to understand. Needles for the tattoo artists are equivalent to brushes for a painter, chisels for a sculptor, or pencils/pens of the illustrator.
In this article we will address the various components of the needle to make better informed choices in our purchasing of products. Tattoo needles are available in different groupings, different spreads, different needle diameters and like paint brushes each configuration was created to do a specific task.
Ways to Purchase Tattoo Needles
First let's start with the two main ways to buy needles. Are you using needles on bars or a cartridge system?
Needles on Bar
This is initially the industry standard. Needle configurations were soldered to a bar with a loop on one end which would hook on the armature bar. Often grommets or paper towels were used to create a snug fit of the needle bar on the armature bar this reduced sway and softened impact. Standard needle bars usually require multiple machines to be used for multiple needle configurations and are often tuned to work specifically with particular groupings.
Cartridge System
Cartridge needles have become super popular over recent years due to their quick-change ability while using minimal machines. They are often used in conjunction with rotaries. Unlike traditional needle bar systems where the spring tension is in the machine, the cartridge system has a built-in spring set up. A cartridge system often only requires a single machine to utilize a vast number of configurations and in membrane and band/spring systems.
- Band/Spring drives utilizes either a small spring or rubber band to create the tension/return on the needle. These systems can often lack a back flow valve and may allow for pigment to move up through the cartridge system into the tube device (it is worth testing this out to esure fluid is not going into tube system.
- Membrane systems utilize a tension and built-in backflow valve that reduces the risk of cross contamination.
Learn the Tattoo Needle Code System
Now that we have gotten that out of the way, needles are often purchased using a code system, so let’s break that down.
On a box of needles we may see the following:
1007RSMT / 10 07 RS MT
|
10: |
This first number is the guage (it may also say .30mm on box) |
|
07: |
This second number is the needle count, This particular grouping is made up of 7 needles |
|
RS: |
This is the needle grouping or configuration, this is a Round Shader |
|
MT: |
This is the taper length, MT here is Medium Taper |
Below we will further discuss what these mean and how to choose the right product.
DIAMETER/GAUGE:
The diameter of a needle is based on the thickness of the individual needles used in a needle grouping. It is often measured in either millimeters or gauges. The diameter of the needle is important as it directly affects the ink flow into the area being tattooed. The finer or smaller the diameter the finer the areas of ink flow.
There are three main sizes used in tattooing: 8 gauge, 10 gauge, and 12 gauge. But some needle companies may extend down to a 4 gauge and up to a 14 gauge. We focus on the 3 main sizes:
#8 Gauge (.25mm)
Often referred to as bugpins, these are one of the smaller needle gauges. These are used when a more controlled flow of pigment is desired. These needles often create smaller/tighter needle configurations as well as penetration marks and are often referred in black and gray and detail work.
#10 Gauge (.30 mm)
Often referred to as double zeros 00, these are popular sizes in all needle groupings and tattoo styles. These have a bit higher inflow rate than the #8 making them a bit more versatile
#12 Gauge (.35 mm)
Often referred to as a standard or standard 12, there is a very common and popular needle especially in traditional work, bold lining, and color packing as it offers more ink flow and larger penetration area.

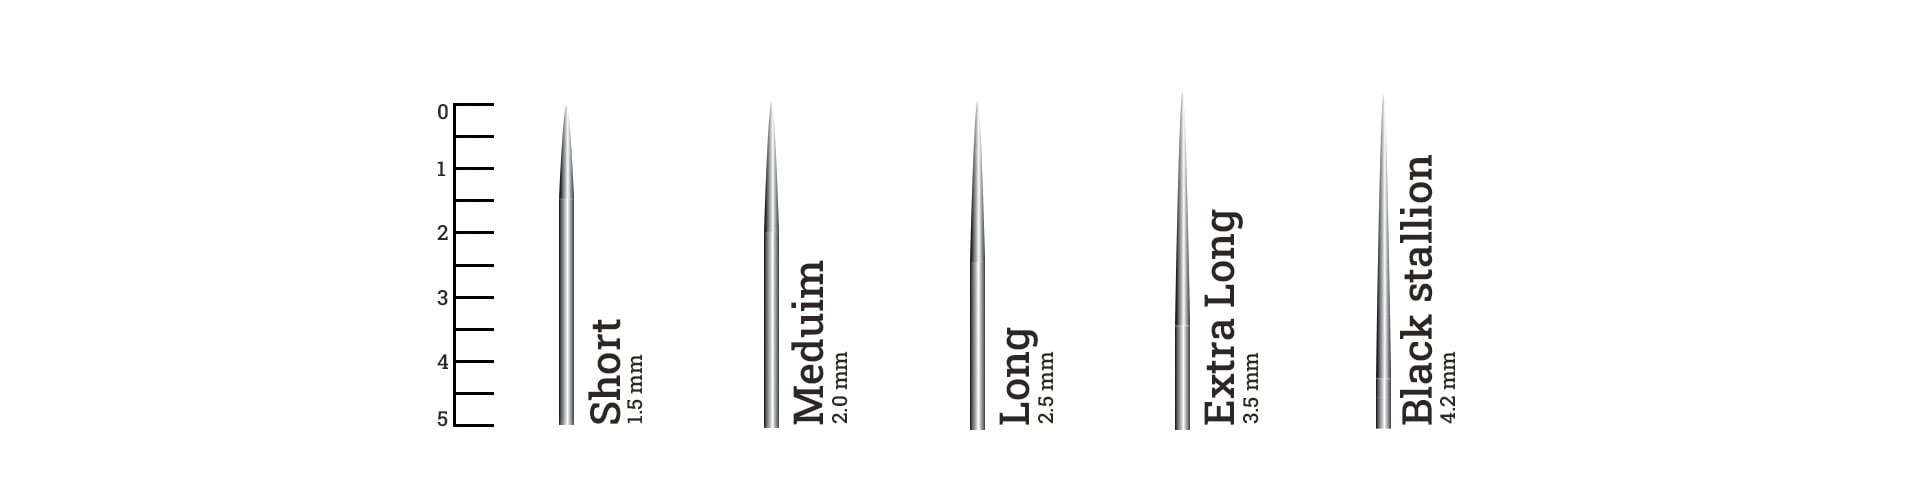
NEEDLE TAPER
The needle taper is based on the length to which the bar angles from its true diameter to the tip. So a long taper has a longer distance from the widest part of the tip than a medium or short taper. When soldered together, long tapers tend to create tighter groupings depending on how high they are soldered. A long taper bugpin needle will create one of the tightest configurations while #12 short taper configurations will allow for more space around and between the needle tips.
- Long tapers may be better suited to lining, color blending, and gray shading
- Medium tapers may be better for color packing.
NEEDLE COUNT
This is the amount of needles used to create a configuration. A 09RL is a round liner consisting of 9 needles. A 13CM is a curved mag containing 13 needles. The more needles the larger the configuration. A 15mag will essentially be 3 times wider than a 5 mag.
TATTOO NEEDLE GROUPING TYPES
There are 2 basic shapes when grouping needles, one shape is a round (which includes Round Liners, Round Shaders, Hollow Liners) the other is a flat shader shape (this groups consists of standard Magnums, Curved Magnums, Stacked Magnums and Flats)
The first group is most associated with lining and detail work and more recently shading. The second group is often most associated with filling larger areas with color, gradations of shading or color blends. Although needle configurations were created with specific tasks in mind, they can be used to create different effects once mastered.
ROUND TATTOO NEEDLE TYPES & USES
Rounds are created when the needles are configured into circular patterns, often using an odd number of needles. These round forms can be altered by using different taper lengths, needle diameters and the distance the solder is placed from the tip of the needle which can create tighter or looser configurations. Different round configurations include the following: Round Liner (RL), Tight Liner (RLT), Round Shader (RS), Hollow Round Liner (center needle is missing to create a hollow area between the needles which works as a larger pigment reservoir)
Rounds are generally used for lining, dotwork, detail work, script, color packing small areas, micro tattooing, whip shading.
Round Liner (RL) (RLT)
Round liners are soldered into a round pattern meant to create tight, clean linework. The needle count usually ranges from 1-18. The Taper length as well as needle gauge can vary which will change the line thickness. Tight liners often use 8 gauge or smaller needles and longer tapers. The distance the solder is placed on the needle bar itself can also affect needle tightness as well as pigment dispersion.
Round Shader (RS)
Round shaders are similar to round liners only the configurations are often looser. These are often used for thicker linework, shading, and color.
Hollow Liner (HRL)
These are similar to round shaders only there is an intentional gap in the center which allows for more pigment. These are also good for thicker linework, shading and coloring.
MAGNUM SHADERS
Magnum Shaders are created by either weaving or stacking two flat rows of needles and have a flat appearance. The needle count is odd with a larger number of needles on the bottom row much like a pyramid or step. For example, a 9 mag will have 5 needles on the bottom row and 4 on the top. Weaved magnums allow for more space between the needles than stacked magnums. Bugpin magnums are often one size smaller than the standard version of a similar needle count. For example, a 9 bugpin mag will actually share the same tube size as a 7 standard magnum. Magnums also come curved or straight. A straight magnum means all the needle tips are straight in a line whereas a curved magnum will have a slight curve so that the middle needles are the first to penetrate the skin and the grouping tapers slightly down toward the edges. Often these are used for smoother/softer blending
These often show up in the following configurations: Standard Magnum, Curved Magnum, Bugpin Magnum, Curved Bugpin Magnum.
Magnum needles often deliver a lot more pigment to a larger area requiring less passes and reducing trauma to the skin than trying to do the same thing with a round. Magnums are best for color blending, color packing, smooth gradients being a perfect tool for most styles of tattooing.
Magnum Shader (MG)
Magnum shaders tend to be the industry standard in color packing and shading. Created using a weaved needle method these offer more space between the needles than a stacked mag.
Curved Magnum Shader (CM)
Curved magnum shaders sometimes referred to as soft edge or soft magnums are designed where the needles arch at the center creating a difference in the way they penetrate the skin then a standard magnum. This design allows for softer edges in blending and is often preferred in blending work.
Double Stack Magnum Shader (MG2)
Not as common as the standard magnum, the main difference is the needles are stacked rather than weaved and so are in a tighter configuration then a standard magnum. This allows for more control of intricate work .
Flat Shader (FT)
Flats are best described as a single layer magnum as there is only one row of needles. These aren't as popular as magnums and must be handled carefully as these run a risk of cutting the skin similar to a blade. However, they can be us for lining, shading, shading and are sometimes used for intricate work such as geometric and mandala patterns.
OTHER CONSIDERATIONS WHEN CHOOSING TATTOO NEEDLES
- Are your needles pre-sterilized? Unless you plan to own the equipment to properly sterilize your needles, make sure that your needles are individually blister packaged, EO Gas Sterilized, and that the label contains the expiration date.
- Are your needles made with the highest quality metals and plastics? Some lower quality needles are made using lower quality steel and some have been found to have used lead-based solder.
- Needle friction on tube can cause a wearing down of needle as well as plastic or metal debris/filings to ending up in tattoo increasing the time it takes heal. Try and find products that use medical grade plastics and high quality high strength needles.
- The placement of solder. This can play a role in flexibility and tightness of a needle as well as the amount of pigment it can carry. Depending on how close to the needle tip the solder is the needle can become more or less flexible. For something like whip shading you may want a grouping where the solder is a bit further back allowing some flex in the mag or you may also discover a liner has been created too tightly where the solder is too close to the needle tip.
- Textured and Carbon needles may sometimes be offered. These needles have micro indentations to allow for more pigment to be held and dispersed into the skin.
- Not all products are created to the same standards of quality. Needles are not the place where you want to skimp on quality. You may end up trying a few products before finding the one you love.
- Consider buying an eye loop to check for needle imperfections such as barbed, hooked, or blunted needles before and during your tattoo.